This is a tutorial for using macOS to install OpenWrt on a TP-Link TL-MR3020 router via a serial port from the CLI.
Target audience
This tutorial is targeted toward individuals possessing basic to intermediate Linux expertise, and who own a TL-MR3020 which is either bricked (i.e., firmware does not load), or to which they do not possess the administrative credentials required to login and flash the firmware from the web interface.
Prerequisites
You will need the following items in order to successfully complete the instructions outlined in this tutorial.
- A macOS computer
- A TP-Link TL-MR3020 router
- 1 x USB UART adapter (e.g., Adafruit Industries 954 USB to TTL Serial Cable )
- 1 x USB A-Male to Mini-B charging cord
- 1 x Category 5 (CAT5) Ethernet cable
- Male to male jumper wires (e.g., Adafruit Industries 1956 Premium Male/Male Jumper Wires - 20 x 3" (75mm) )
- Internet access
Step 1 - Prepare the environment
Configure a static IP on your Ethernet interface
In order to copy the firmware from your computer to the router you must first configure an IPv4 address on your computer’s Ethernet interface so that it may communicate with the router when connected.
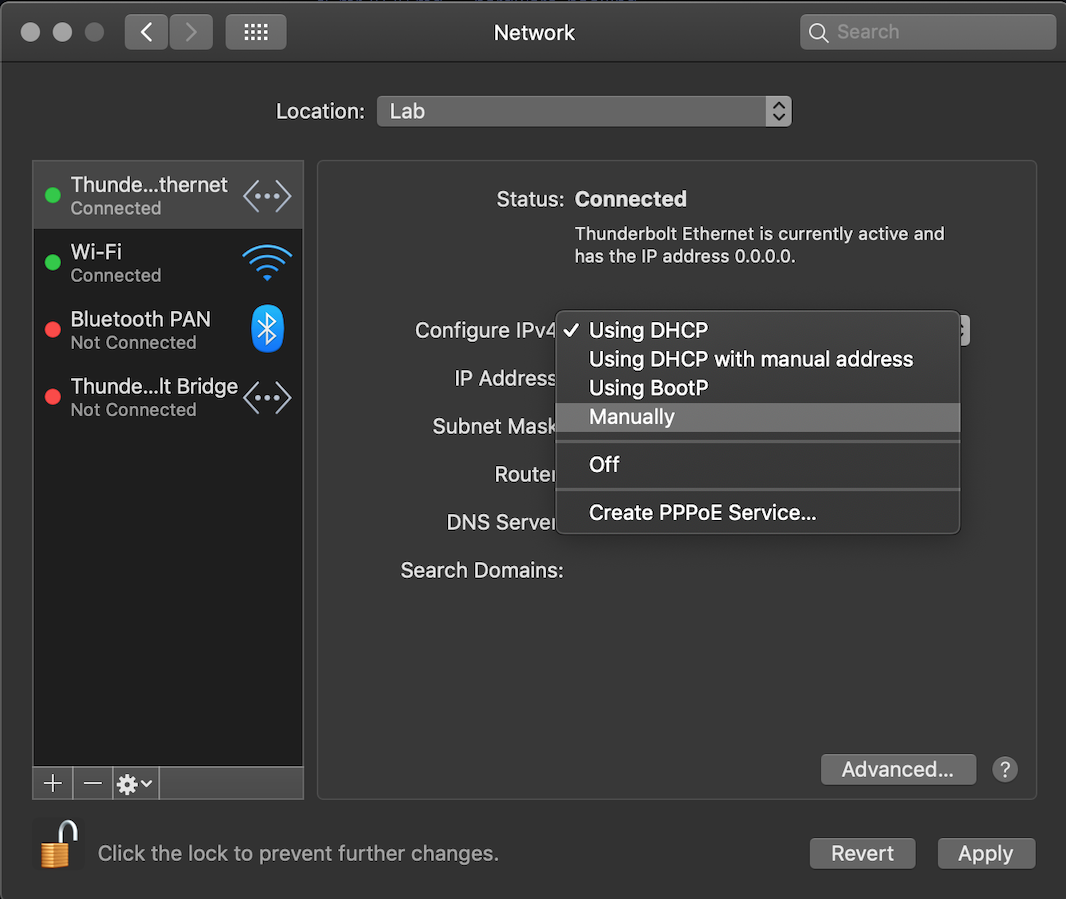
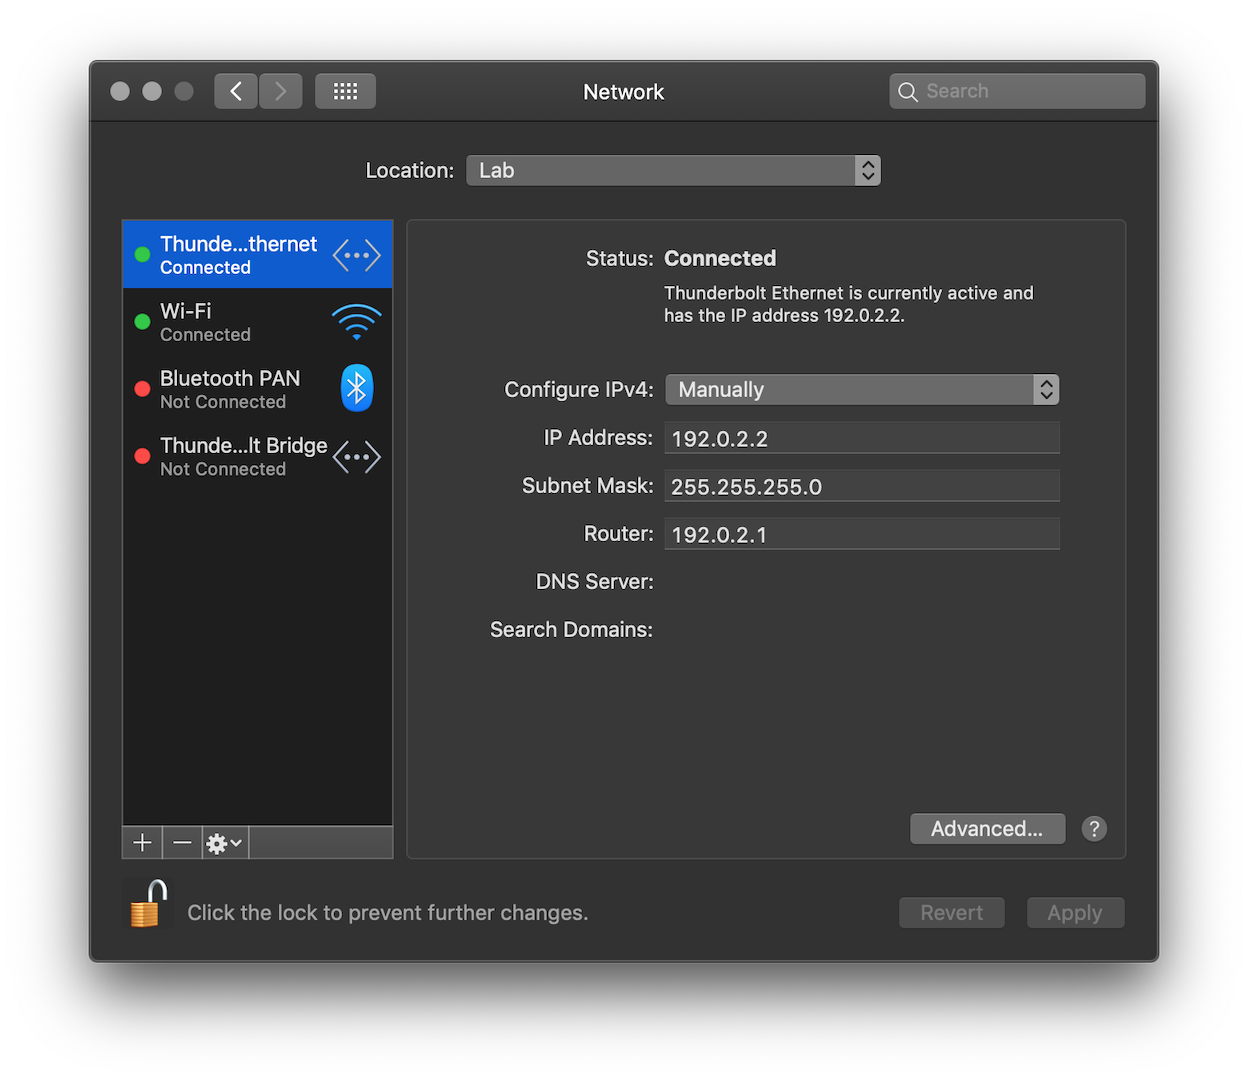
To configure an IP on macOS, go to System Preferences > Network and select your Ethernet interface. Click on the dropdown next to Configure IPv4 and select the option ‘Manually’.
macOS manual IPv4 address configuration on Ethernet
Configure an IPv4 address such as 192.0.2.2 with a subnet mask of 255.255.255.0.
Click Apply to save the configuration.
Note: This address will not be accessible on your primary network. It will be used solely for communication with the router.
Configuring a static IP on macOS
Download the OpenWrt firmware
Head over to OpenWrt’s website to download the latest, supported release firmware for the TL-MR3020 . Be sure to download the link under the column entitled Firmware OpenWrt Install URL.
At the time of writing, the current supported release is 17.01.5 .
Configure the TFTP server
In order to copy the firmware to the device, you will need to set up a Trivial File Transfer Protocol (TFTP) server. This server will be used by the router to download the firmware from your computer.
macOS ships with a TFTP server in the base installation. Use the following launchctl command to temporarily enable the TFTP server under macOS’ service manager, launchd
.
$ sudo launchctl load -F /System/Library/LaunchDaemons/tftp.plist
The daemon will automatically start upon receiving a network connection request to the computer’s IP on either TCP/UDP port number 69 –– the standard TFTP port number.
Next, copy the firmware downloaded in the previous step to the TFTP server’s data directory, /private/tftpboot/.
$ sudo cp ~/Downloads/lede-17.01.5-ar71xx-generic-tl-mr3020-v1-squashfs-factory.bin /private/tftpboot/
Step 2 - Open the device
The top of the router comes off with a bit of prying. Insert a plastic tool to carefully pry open the plastic top.
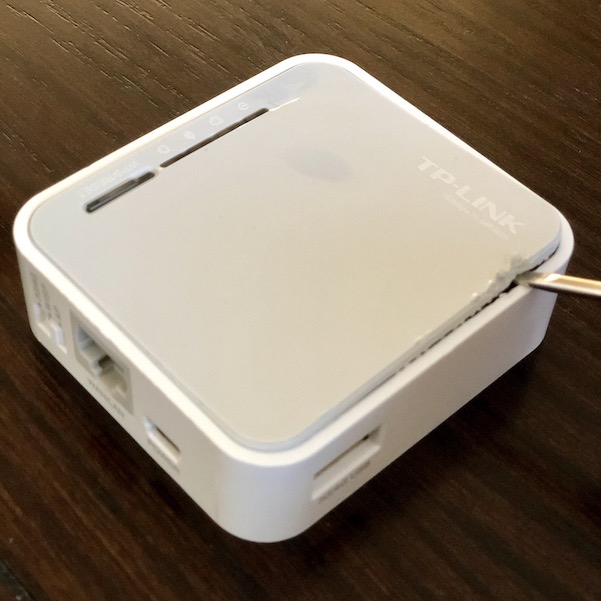
Prying open the top of a TP-Link TL-MR3020 with a screwdriver
Step 3 - Connect the USB adapter to the UART pins on the router
Plug the USB adapter into your computer.
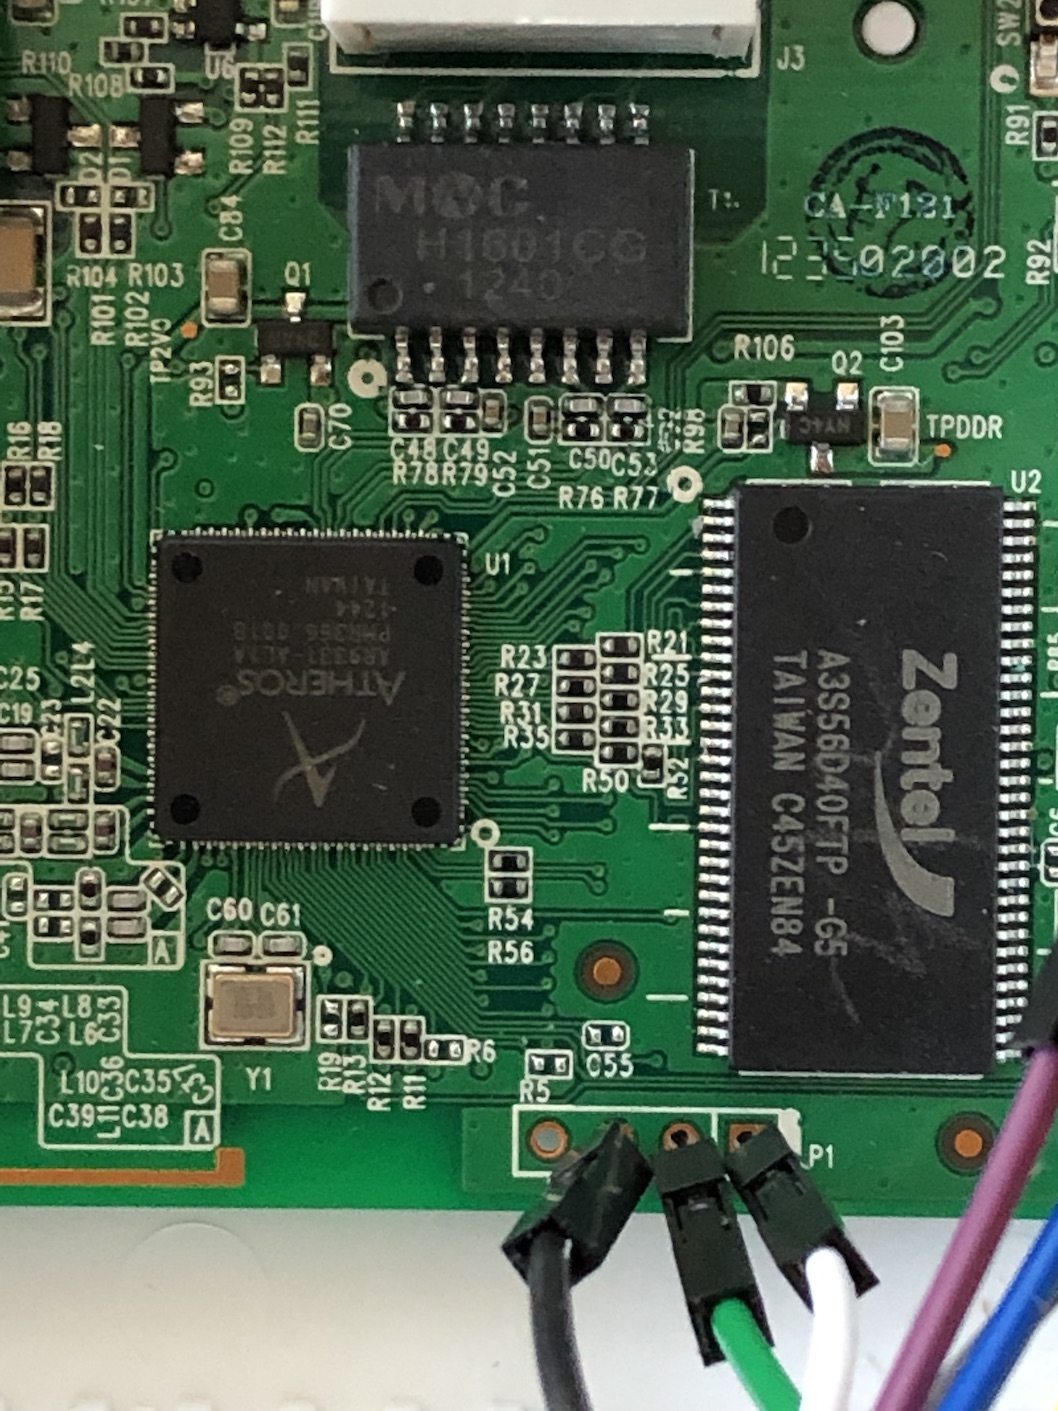
Next, connect the transmit, receive, and ground wires from the UART adapter to the associated pins on the router which are highlighted in the following picture just below the RAM.
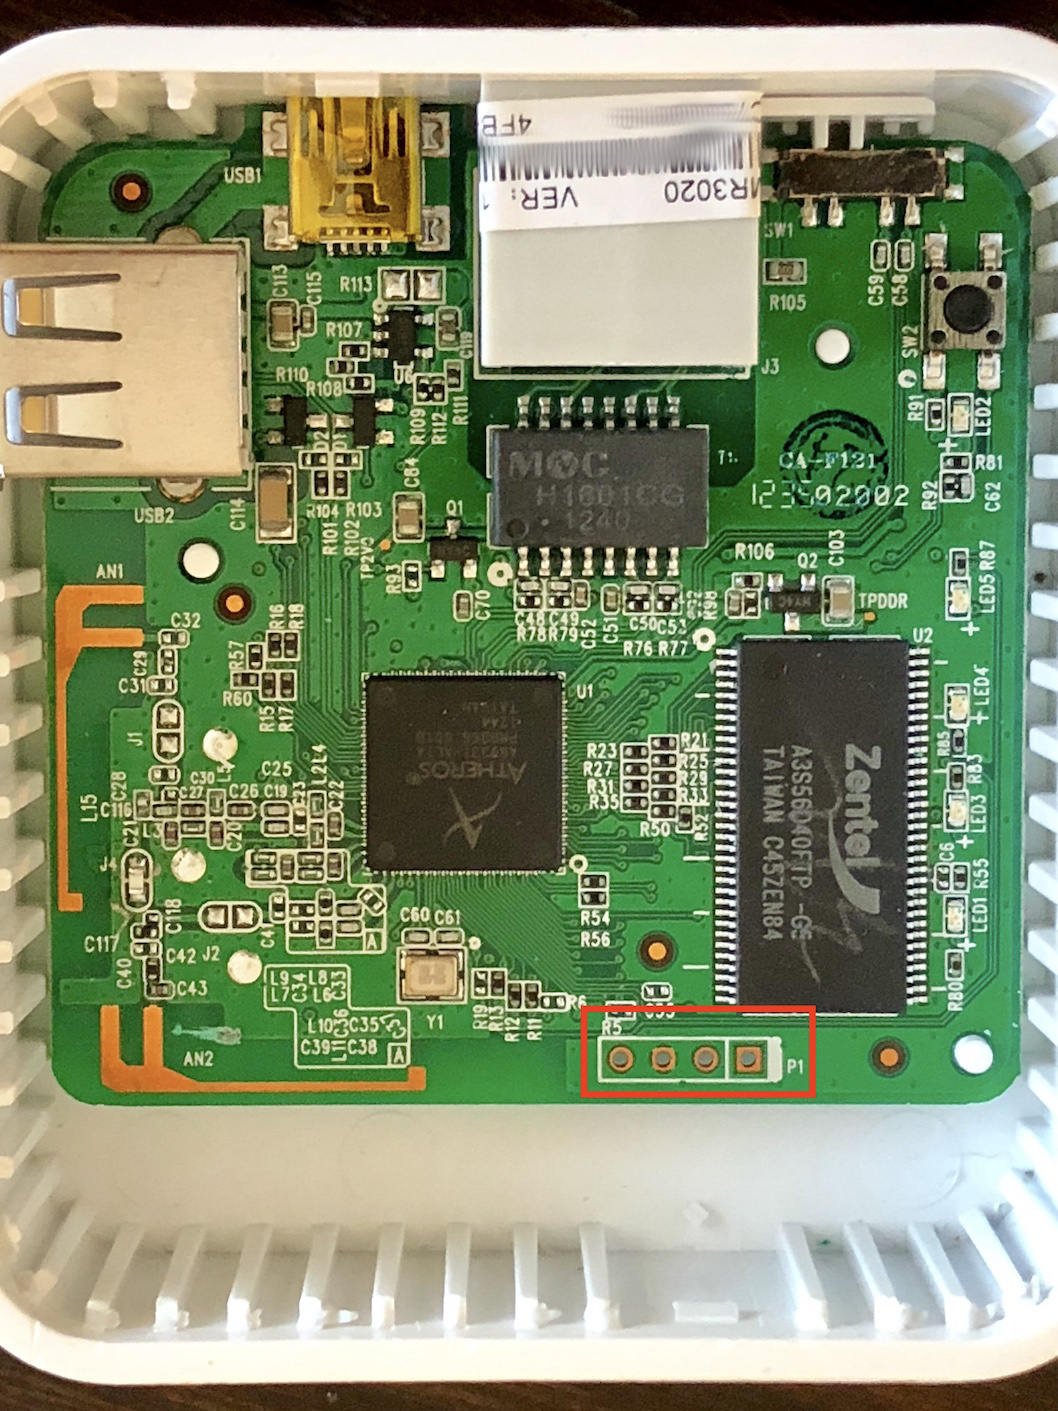
TL-MR3020 UART pin location
The order of the pins from left to right is: Power, Ground (GND), Receive (RXD), and Transmit (TXD).
Using the jumper wires, connect the cables from the USB UART adapter to the UART pins on the router’s board. The resultant connections should be:
| TL-MR3020 | USB-UART | COLOR |
|---|---|---|
| GND | GND | BLACK |
| RXD | TXD | GREEN |
| TXD | RXD | WHITE |
Note: Be sure to swap the TXD and RXD when connecting to the router.
Jumper connections to UART connections on TL-MR3020
Step 4 - Connect the Ethernet cable to the router
Connect the Ethernet cable between your computer and the router’s Ethernet port.
Step 5 - Initiate a console connection to the router
Open a Unix console on macOS using a terminal emulator such as the built-in Terminal application (Applications > Utilities > Terminal) or iTerm2 .
Next, use the cu command which is built into macOS to initiate a console connection from your computer to the router. Alternatively, you can use a GUI-based serial console program such as CoolTerm
or Serial
from DecisiveTactics.
You will need to provide cu the name of your TTY device, and a baud
rate of 115200 bits per second to use for the connection.
cu --line /dev/tty.SLAB_USBtoUART --speed 115200
You will not see any output on your screen until the next step.
Step 6 - Power on the router
Connect the USB A end of your USB cable to either a USB wall charging adapter or a second USB port on your computer.
Connect the mini-B end of your USB cable to the USB port on the router. You should see text output on your terminal screen from the router’s boot loader as the router boots.
U-Boot 1.1.4 (Aug 17 2012 - 15:21:03)

AP121 (ar9330) U-boot

DRAM:  32 MB
led turning on for 1s...
id read 0x100000ff
flash size 4194304, sector count = 64
Flash:  4 MB
Using default environment

In:    serial
Out:   serial
Err:   serial
Net:   ag7240_enet_initialize...
No valid address in Flash. Using fixed address
No valid address in Flash. Using fixed address
: cfg1 0x5 cfg2 0x7114
eth0: 00:03:7f:09:0b:ad
ag7240_phy_setup
eth0 up
: cfg1 0xf cfg2 0x7214
eth1: 00:03:7f:09:0b:ad
athrs26_reg_init_lan
ATHRS26: resetting s26
ATHRS26: s26 reset done
ag7240_phy_setup
eth1 up
eth0, eth1
Autobooting in 1 seconds
## Booting image at 9f020000 ...
   Uncompressing Kernel Image ... OK

Starting kernel ...
Before the router boots the kernel, quickly type tpl into the terminal to access the U-Boot console.
There is a very short window in which to type the aforementioned keys before the router begins booting the operating system. You may need to reboot the router, and make multiple attempts to successfully enter the keystrokes.
If successfully entered, you will see the following U-Boot prompt.
hornet>
Fun fact: The TL-MR3020 uses the ALFA Network Hornet-UB embedded board, hence the name ‘hornet’ in the boot loader’s prompt.
Step 7 - Download the firmware onto the router
In order to download the firmware onto the router you must configure an IP address for the router, and set the TFTP server IP as the IP address of your computer.
hornet> setenv ipaddr 192.0.2.10
hornet> setenv serverip 192.0.2.2
Next, use the tftpboot command to download the firmware from the TFTP server to the router. The command takes several argument options.
tftpboot [loadAddress] [bootfilename]
Execute the following to download and install the OpenWrt firmware.
hornet> tftpboot 0x80000000 lede-17.01.5-ar71xx-generic-tl-mr3020-v1-squashfs-factory.bin
You should see output similar to the following if the router is able to connect to router computer and successfully download the firmware.
hornet> tftpboot 0x80000000 lede-17.01.5-ar71xx-generic-tl-mr3020-v1-squashfs-factory.bin
Using eth1 device
TFTP from server 192.0.2.2; our IP address is 192.0.2.10
Filename 'lede-17.01.5-ar71xx-generic-tl-mr3020-v1-squashfs-factory.bin'.
Load address: 0x80000000
Loading: #################################################################
         #################################################################
         #################################################################
         #################################################################
         #################################################################
         #################################################################
         #################################################################
         #################################################################
         #################################################################
         #################################################################
         #################################################################
         ######################################################
done
Bytes transferred = 3932160 (3c0000 hex)
Make note of the hexadecimal value indicating the number of bytes transferred - in this case, 0x3c0000. This value will be needed later.
Step 8 - Install the firmware onto the router’s flash memory
Next, use the erase command to erase the existing flash memory. The help command can be used to provide the syntax of the erase command.
hornet> help erase
...
erase start +len
    - erase FLASH from addr 'start' to the end of sect w/addr 'start'+'len'-1
...
The console output “Booting image at 9f020000 …” in Step 6 shows the router’s current firmware is located at memory address 0x9f020000.
You will need to erase a sufficient amount of space starting from this address to fit the size of the new firmware. Recall the bytes transferred value saved from Step 8. This value will be used as the the +len offset in the erase command.
Execute the following command to erase the flash firmware. You should see the subsequent output upon successful deletion of the specified memory range.
hornet> erase 0x9f020000 +0x3c0000

First 0x2 last 0x3d sector size 0x10000
  61
Erased 60 sectors
hornet>
Then, use cp.b to install the downloaded firmware onto the router’s flash memory.
hornet> help cp.b
cp [.b, .w, .l] source target count
    - copy memory
Execute the following.
hornet> cp.b 0x80000000 0x9f020000 0x3c0000
Copy to Flash... write addr: 9f020000
done
Step 9 - Boot the OpenWrt OS
Finally, instruct the router to boot the newly installed OpenWrt firmware.
hornet> bootm 9f020000
The router will be accessible at http://192.168.1.1 .
Note: You will need to reconfigure your computer’s IP into this subnet before you will be able to access the router at this new address.